Inhaltsverzeichnis
Netzwerk-Konfiguration
IP-Befehl benötigt iproute2-Paket
sonstige Pakete:
apt install telnet traceroute
apt install nftables
apt install net-tools #netstat
apt install nmap
apt install tcpdump
apt install dnsutils --no-install-recommends #dig
apt install iperf3
apt install ethtool
die Konfiguration auf dieser Seite basiert auf debian stretch, sollte genauso unter Ubuntu funktionieren setzt Kernel 4.14 oder höher voraus (DSA-Treiber für Port-Trennung)
im Kernel 4.14 existiert eth0 als Verbindung zwischen CPU und dem Switch-Chip (mt7530), an denen die Ports wan und lan0-4 angeschlossen sind. diese Verbindung muss zuerst „up“ genommen werden.
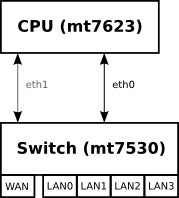
Die Zuordnung der Ports auf eine GMAC ist definiert in der dts-Datei und kann mit „ip a“ angezeigt werden
Mit Kernel 4.14 >.52 wurde in meinem Repo die GMAC #2 (eth1) hinzugefügt und der Wan-Port darauf verbunden.
ohne weitere Konfiguration sind die LAN-Ports getrennt und benötigen eine eigene IP-Konfiguration in verschiedenen Subnetzen
viele Nutzer möchten sicherlich alle LAN-Ports im gleichen Netzwerk-Segment haben, so empfiehlt sich sie mit einer Netzwerkbrücke zu verbinden, um nur 1 IP-Konfiguration für “LAN” zu haben
MAC-Adresse
Die MAC-Adresse lässt sich nur für die GMAC (Verbindung Switch-CPU) setzen. Aktuell wird unter Kernel 4.14 nur eine erkannt (eth0). Hardwareseitig sind 2 GMACs vorhanden.
Möglichkeit via UDEV von hier
$ cat /etc/udev/rules.d/00-static-mac-address.rules
ACTION=="add", SUBSYSTEM=="net", KERNELS=="1b100000.ethernet", RUN+="/sbin/ip link set dev %k address ae:fc:de:ad:be:ef"
/etc/network/interfaces
iface lan0 inet static
  address 192.168.0.10
  netmask 255.255.255.0
  gateway 192.168.0.5
#  pre-up ip link set $IFACE up
  pre-up ip link set $IFACE address 02:01:02:03:04:08 up
systemd nutzen:
/etc/systemd/network/10-wan.link
[Match]
OriginalName=wan

[Link]
MACAddress=XX:XX:XX:XX:XX:XX
Gerätename
Ubuntu 18.4 (und vermutlich kommende Debian-Varianten) nutzen neue Gerätenamen. Wlan-Geräte heißen nicht mehr wlanX sondern wlpXsY
um das zu verhindern, kann man „net.ifnames=0“ zur Kernel-Cmdline hinzufügen (uEnv.txt bei uboot) und dann wie gewohnt via udev ubenennen
/etc/udev/rules.d/70-persistent-net.rules
SUBSYSTEM=="net", ACTION=="add", ATTR{address}=="f8:62:aa:50:15:c8", NAME="wlan1"
an die Attribute kommt man mit
udevadm info --attribute-walk /sys/class/net/<interface-name>
damit die Änderungen übernommen werden soll folgendes funktionieren (hat es bei mir aber nicht, obwohl ifnames schon aktiv und mein Interface schon wlanx hieß, auch den udev service neu starten hat nicht geklappt):
udevadm control --reload-rules && udevadm trigger
nach einem Reboot hat es aber gepasst
alternativ kann man das entsprechende Treibermodul neu laden (nachdem man die udev-rules neu geladen hat)
modprobe -r mt76x2e
modprobe mt76x2e
IP
dauerhaft
/etc/network/interfaces:
#upstream-Port (NIC zwischen CPU und MT7530-Switch) auf up
auto eth0
iface eth0 inet manual
  pre-up ip link set $IFACE up
  post-down ip link set $IFACE down

#upstream-Port #2 4.14.x >52 (NIC zwischen CPU und MT7530-Switch) auf up
auto eth1
iface eth1 inet manual
  pre-up ip link set $IFACE up
  post-down ip link set $IFACE down

#dann die lan-ports konfigurieren
auto lan0
iface lan0 inet static
  hwaddress ether 08:00:00:00:00:00 # if you want to set MAC manually
  address 192.168.0.10
  netmask 255.255.255.0
  gateway 192.168.0.5
  pre-up ip link set $IFACE up
  post-down ip link set $IFACE down
systemd
/etc/systemd/network/eth0.network:
[Match]
Name=eth0

[Network]
DHCP=no
LinkLocalAddressing=no
ConfigureWithoutCarrier=true
/etc/systemd/network/wan.network
[Match]
Name=wan

[Network]
BindCarrier=eth0
#ConfigureWithoutCarrier=true

#IPForward=yes
#IPMasquerade=yes
Address=192.168.0.18/24
DNS=192.168.0.10
Gateway=192.168.0.10
Wird ConfigureWithoutCarrier beim wan-port gesetzt wird die default-route nicht gesetzt,weil die Adresse ungültig ist (da Netzwerk down zum Zeitpunkt der Konfiguration). Das darf also nur gesetzt werden,wenn keine default-route gesetzt werden muss.
zweite Ethernet-Anbindung (gmac)
benötigt kernel-patch für eth1 + aux interfaces (aktuell nur in 5.15)
- create a bridge for use for wan

    /etc/systemd/network/11-wanbr.netdev
    [NetDev]
    Name=wanbr
    Kind=bridge

    [Bridge]
    DefaultPVID=0 # should be different to other vlan-aware bridges (like lanbr)
    VLANFiltering=1

- map aux and wan to vlan-aware bridge
- traffic will be tagged inside with vlan-id 99

    /etc/systemd/network/12-wanbr-bind.network
    [Match]
    Name=wan aux

    [Link]
    RequiredForOnline=no

    [Network]
    BindCarrier=eth0
    Bridge=wanbr

    [BridgeVLAN]
    VLAN=99
    PVID=99
    EgressUntagged=99

- put wanbr up by default

    /etc/systemd/network/13-wanbr.network
    [Match]
    Name=wanbr

    [Network]
    BindCarrier=eth0
    ConfigureWithoutCarrier=true

- configure eth1 as wan

    /etc/systemd/network/15-wan.network
    [Match]
    Name=eth1

    [Network]
    BindCarrier=eth0

    Address=192.168.0.18/24
    Gateway=192.168.0.10
    DNS=192.168.0.10

    IPForward=yes
temporär
ifconfig eth0 192.168.0.10 netmask 255.255.255.0 broadcast 192.168.0.255
ip addr set 192.168.0.10/24 broadcast 192.168.0.255 dev eth0
DHCP
Client
/etc/network/interfaces:
auto lan3
allow-hotplug lan3
iface lan3 inet dhcp
Server
/etc/dnsmasq.conf (aktivieren durch entfernen des # am Zeilenanfang)
conf-dir=/etc/dnsmasq.d
/etc/dnsmasq.d/interfaces.conf
#interface=eth0
interface=wlan0
#interface=eth1
interface=ap0

# DHCP-Server nicht aktiv für Schnittstelle
#no-dhcp-interface=ppp0
no-dhcp-interface=eth0
no-dhcp-interface=eth1

#dhcp-authoritative
dhcp-range=ap0,192.168.10.100,192.168.10.150,255.255.255.0,48h
dhcp-option=ap0,3,192.168.10.1
dhcp-range=wlan1,192.168.11.100,192.168.11.150,255.255.255.0,48h
dhcp-option=wlan1,3,192.168.11.1
/etc/dnsmasq.d/interfaces.conf
service dnsmasq restart
mehrere IP pro MAC mit dnsmasq: https://stackoverflow.com/a/26964151
mehr Inforationen hier: dnsmasq
IPv6
ip -6 addr add fd00:a::12/64 dev wan
ping -6 -I wan fe80::a02:ff:fe00:10 #für ping auf fe80 muss Interface angegeben werden
ip -6 route
ip -6 route add default dev he-ipv6 #if you use he-ipv6-tunnel and no default-route is set
ping6 2001:4860:4860::8844 #google-dns
sysctl
sysctl -w net.ipv6.conf.all.autoconf=1
sysctl -w net.ipv6.conf.all.accept_ra=1
do not set forwarding if you want RAs
# Uncomment the next line to enable packet forwarding for IPv6
#  Enabling this option disables Stateless Address Autoconfiguration
#  based on Router Advertisements for this host
#net.ipv6.conf.all.forwarding=1
if RAs were not received/sent after config-change (e.g. sysctl), try to restart radvd
interfaces
auto wan
...
iface wan inet6 auto
or
iface lanbr0 inet6 static
  address fd00:A::10
  netmask 64
radvd
interface lanbr0 {
  AdvSendAdvert on;
  prefix fd00:A::0/64
  {
    AdvOnLink on;
    AdvAutonomous on;
    AdvRouterAddr on;
  };
  prefix 2001:470:xxxx:0::/64 #he
  {
    AdvOnLink on;
    AdvAutonomous on;
    AdvRouterAddr on;
  };
  route ::/0
  {
    AdvRoutePreference high;
  };
};
NAT/Routing
NAT
zum aktivieren von Network Adress Translation (private IPs hinter einer öffentlichen IP)
ipt=/sbin/iptables
if_wan=wan
${ipt} -t nat -A POSTROUTING -o ${if_wan} -j MASQUERADE
Routing
Routing für IPv4 aktivieren
echo 1 > /proc/sys/net/ipv4/ip_forward
Alternative:
nano /etc/sysctl.conf
#activate net.ipv4.ip_forward=1 and net.ipv6.conf.all.forwarding=1 by removing # at beginning of line
sysctl -p /etc/sysctl.conf
Standard-Gateway ändern:
ip route del default
ip route add default via 192.168.50.2
statische Routen zu anderen Netzwerken
Pakete werden an das Default-Gateway geschickt, wenn das Netz dem Router nicht bekannt ist. In klassischen Heimnetzen existiert meist nur ein Router und dort ist das default-Gateway die Internet-Schnittstelle und an den Client-Rechnern ist das Default-Gateway der Router.
statische Routen werden benötigt, wenn ein Netz nicht direkt am Router hängt und nicht über sein Default-Gateway (hier WAN) erreichbar ist

- im Router #1 muss eine statische Route für das Netz 10.0.3.0/24 mit einem Next-Hop 10.0.2.2 (schickt Pakete über lan#2) eingerichtet werden
route add -net 10.0.3.0 netmask 255.255.255.0 gw 10.0.2.2
ip route add 10.0.3.0/24 via 10.0.2.2
- im Router #2 muss eine statische Route für das Netz 10.0.1.0/24 mit einem Next-Hop 10.0.2.1 (schickt Pakete über lan#1) eingerichtet werden
route add -net 10.0.1.0 netmask 255.255.255.0 gw 10.0.2.1
ip route add 10.0.1.0/24 via 10.0.2.1
Beispiel für Netz 192.168.50.x hinter Router mit IP 192.168.0.10
route add -net 192.168.50.0 netmask 255.255.255.0 gw 192.168.0.10
ip route add 192.168.50.0/24 via 192.168.0.10
DNS
/etc/resolv.conf
enthält die IP-ADresse des Nameservers, z.B.
nameserver 192.168.0.10
systemctl-resolvd:
ln -fs /var/run/systemd/resolve/resolv.conf /etc
systemctl restart systemd-resolved
aktuell verwendeten Server ermitteln
dig | grep SERVER
Netzwerkbrücke
apt-get install bridge-utils
/etc/network/interfaces:
auto lan1
iface lan1 inet manual
auto lan2
iface lan2 inet manual

auto br0
iface br0 inet static
    address 192.168.40.1
    netmask 255.255.255.0
    bridge_ports lan1 lan2
    bridge_fd 5
    bridge_stp no
temporär
brctl addbr br0
brctl addif br0 lan2
ip addr add 192.168.0.18/24 dev br0
ip link set br0 up

brctl show br0
brctl delif br0 lan1
ip link set br0 down
brctl delbr br0
VLAN
temporär:
ip link add link wan name wan.140 type vlan id 140
#löschen
ip link del wan.140
/etc/network/interfaces:
auto lan3.60
iface lan3.60 inet static
  address 192.168.60.10
  netmask 255.255.255.0
vlan-aware bridge
# ip link add name br0 type bridge
# ip link set dev br0 up
# ip link set dev lan3 master br0
# ip link set br0 type bridge vlan_filtering 1
# ip a a 192.168.50.1/24 dev br0
# ip link set lan3 up
# bridge vlan add vid 100 dev br0 self
# bridge vlan add vid 100 dev lan3
# bridge vlan
port              vlan-id
lan3              1 PVID Egress Untagged
                  100
br0               1 PVID Egress Untagged
                  100
# ip link add link br0 name br0.100 type vlan id 100
# ip a a 192.168.51.1/24 dev br0.100
# ip link set br0.100 up
on the other side create normal vlan
# ip link add link enx00133b9302ee name eth2.100 type vlan id 100
# ip a a 192.168.51.2/24 dev eth2.100
# ip link set eth2.100 up
Firewall (iptables)
Monitoring
#alles außer ssh
sudo tcpdump -i eth0 port not 22 > tcpdump.log
#alles von oder nach 192.168.0.11
tcpdump -nni lan0 host 192.168.0.11
#alles von 192.168.0.11
tcpdump -nni lan0 src host 192.168.0.11
#alles nach 192.168.0.11
tcpdump -nni lan0 dst host 192.168.0.11
#nur icmp
tcpdump -nni lan0 icmp
#pppoe discovery (PADI-PADT), ppp/lcp wird mit "pppoes" angezeigt
tcpdump -i wan pppoed
#wireshark-compatibles mitloggen (volle Pakete), es geht auch "-s0"
tcpdump -i <interface> -s 65535 -w tcpdump.cap
https://www.rationallyparanoid.com/articles/tcpdump.html https://danielmiessler.com/study/tcpdump/ https://www.cyberciti.biz/faq/network-statistics-tools-rhel-centos-debian-linux/ https://serverfault.com/questions/533513/how-to-get-tx-rx-bytes-without-ifconfig
ip -s link
netstat -i
netstat -s
ethtool -S eth0
cat /proc/net/dev
nmap <IP> -Pn -p T:<PORT>
erweiterte Netzwerk-Konfiguration
Policy Routing
QoS
spezielle konfiguration
Bambit
- vlan 140 ⇒ internet
- vlan 110 ⇒ voip
ip link add link wan name wan.140 type vlan id 140
ip link add link wan name wan.110 type vlan id 110
# 2. pppoe-verbindung muss von anderer MAC-Adresse kommen
ip link set wan.110 down
ip link set wan.110 address 02:01:02:03:04:08 up
pppoeconf wan.140
plog
#config sichern
cp /etc/ppp/peers/dsl-provider /etc/ppp/peers/bambit-internet
pppoeconf wan.110
plog

cp /etc/ppp/peers/dsl-provider /etc/ppp/peers/bambit-voip
#diese datei bearbeiten und diese beiden Optionen auskommentieren:
#defaultroute
#replacedefaultroute

über die option unit <nummer> oder ifname <name> lässt sich der Name des PPP-Interfaces festlegen (um dieses im ppp-ip-up-script unterscheiden zu können)

unit 8 #nennt das Interface ppp8
#ifname ppp-bambit #nennt das Interface ppp-bambit
anpassen der /etc/network/interfaces:
#bambit-inet
auto wan.140
iface wan.140 inet manual

auto bambit-internet
iface bambit-internet inet ppp
pre-up /bin/ip link set wan.140 address 02:11:02:03:04:05 up # line maintained by pppoeconf
provider bambit-internet

#bambit-voip
auto wan.110
iface wan.110 inet manual

auto bambit-voip
iface bambit-voip inet ppp
pre-up /bin/ip link set wan.110 address 02:12:02:03:04:06 up # line maintained by pppoeconf
provider bambit-voip
sind beide Verbindungen aufgebaut, sollte „ip a“ so aussehen:
13: ppp0: <POINTOPOINT,MULTICAST,NOARP,UP,LOWER_UP> mtu 1492 qdisc pfifo_fast state UNKNOWN group default qlen 3
    link/ppp
    inet 217.61.x.y peer 217.61.x.1/32 scope global ppp0
16: ppp1: <POINTOPOINT,MULTICAST,NOARP,UP,LOWER_UP> mtu 1492 qdisc pfifo_fast state UNKNOWN group default qlen 3
    link/ppp
    inet 172.20.x.y peer 172.20.x.1/32 scope global ppp1